 UNITED Static Control Products Contact us | Telephone 719 676 3928 | Search |
|
|
|
The Ultimate Guide to Grounding ESD FloorsFor use with ElectraGuard, ElectraSeal, ESD Glue Down Tiles, Interlocking ESD Tiles, ESD Carpet Tiles and ESD Sheet VinylDownload the Basic Grounding Instructions (1 page pdf) Download the Extended Grounding Instructions (2 page pdf) All ESD flooring material must be grounded to allow the electrostatic charges to flow to ground. The following methods provide easy, secure connections for attaching an ESD flooring to electrical ground. Note: Our ESD flooring requires 2 ground connections for small floors (under 3,000 sf) and one additional ground for every 3,000 sf thereafter.
Note: It is VERY important that the ground system in the building is functioning properly as this CAN impact the functionality of the ESD floor. For electronic manufacturing and most other applications we recommend grounding to an AC electrical ground that has been tested using a Ground Circuit Tester. For applications involving energetics, ground the conductive floor by following the recommendations of the standard you wish to achieve. Be especially careful if the building is mostly grounded to AC electrical but the ESD flooring is grounded to an independent ground rod. Variances in resistance between the two may present:
A) MOST COMMON METHOD (note this is the safest but it requires replacing the plastic faceplate cover with one made of metal):
Note: for a great looking attachment cut any wall base, peel back base and run strip behind the re-glued wall-base.
2) Run another aluminum foil strip (approximately 6" to 12” long) over this 2" or 3" piece that you've placed on the floor (3). Run this strip parallel to the wall and adhere to the flooring substrate (concrete, VCT, etc).
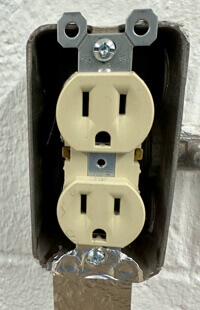
3) Replace the plastic faceplate cover with a METAL face plate cover that comes into contact with the aluminum (or copper) strip. Example
For best results center punch the overlapping strip in a few places (4) to drive the aluminum top surface into the aluminum foil beneath it (the adhesive backing is not conductive).
Note: Why aluminum instead of copper? Aluminum has about the same conductivity. It's more cost effective, bonds well to walls and concrete and doesn't tarnish overtime. We provide FREE aluminum foil ground tape with each order of flooring. For Copper Foil adhesive backed 1/2" and 2" wide tape for ESD Flooring please visit this hyperlink. Note: More grounding attachments will not raise the conductivity of your flooring system or provide increased static control properties. B) OPTIONAL METHOD USING OUTLET (does NOT require replacing the plastic faceplate cover with one made of metal):
1) Turn off power to outlet! Remove face plate cover and bottom screw holding outlet in place. Wrap aluminum foil over and around the bottom "ear" as shown being sure to not leave loosed ends or foil inside outlet. Replace screw running bolt through the foil and into the bolt hole.
2) Run aluminum strip around bottom of outlet (if applicable), down the wall, and onto the floor a few inches.
3) Run another piece of aluminum foil parallel with the wall and over the top of this piece so it looks like a T going up the wall. For best results center punch overlapping strips in a few places to drive the aluminum top surface into the aluminum foil beneath it (the adhesive backing is not conductive). Replace faceplate cover.
Completed
C) GROUNDING TO STEEL STRUCTURAL SUPPORT COLUMNS:
Grind paint and rust from the steel structural support column. Make the area small enough to completely cover with the 2 inch wide ground foil. Cover this area with ground tape. Run it down the column and onto the pre cleaned concrete or sub floor. Center Punch 5 areas of the ground foil into the area on column that has been ground. This drives the top surface of the aluminum or copper INTO the clean steel.
D) COPPER GROUND RODS:
Remove the oxidation from rod (1) by lightly sanding it, wrap tape around the rod as shown in (2), to create a small radius of aluminum at interface of the rod and concrete. Create a pad (3), center it over the rod and drive it down over the rod and aluminum winding. Center Punch the aluminum into the bare copper rod and hose clamp the interface for additional rod to pad security.
Using a standard volt ohm meter place a lead on the aluminum and tip of the copper. The resistance should be less that 1 ohm. Clean any oxidation or dirt from the aluminum or copper pad and coat over it with ESD thick set epoxy or floor paint OR trowel over it with conductive adhesives for the subsequent installation of ESD Sheet vinyl or tiles. Click to expand photo.
For Coatings: Lightly sand the foil on the floor with 320 grit emery paper or course scotch bright. Remove abrasive residue with a microfiber wipe. Apply the coatings over this strip.
For Glue Down Tiles and Sheet Vinyl: Cover the foil that has been applied to the subfloor with the conductive adhesive, place the tile or sheet vinyl over this adhesive and ground strip and roll with a 100 pound vinyl roller.
For Interlocking Tiles: Place the interlocker over the aluminum foil that has been applied to the subfloor. Note: See instructions for full details.
For ESD Carpet Tile: Cover the foil that has been applied to the subfloor with the conductive adhesive, place the carpet tile over the adhesive and ground strip and roll with a 100 pound vinyl roller.
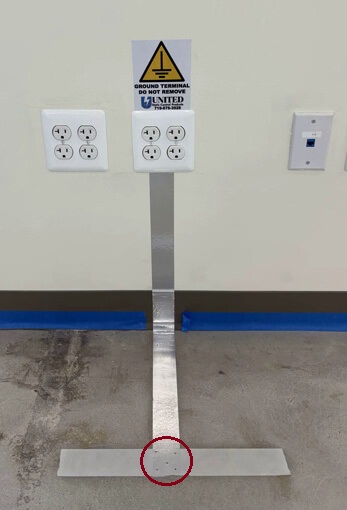
E) EQUIPOTENTIAL AND FULL PERIMETER GROUNDING USING A GROUND LUG:
For ultimate electrical consistency some installations require a run of peel and stick copper foil tape be applied about 6" from each wall. These runs are overlapped and center punched thus providing a Full Perimeter Electrical Ground.
The full perimeter grid exits in an area convenient for the subsequent attachment to an approved electrical ground. The copper or aluminum tape is folded over the floor. A ground lug is placed over the foil where it is held in place with a concrete wedge anchor. A hardwire is attached to the lug and terminated to a bus bar or other approved electrical ground point.
Note: Ground lugs may also be used ON TOP of ElectraSeal ESD Concrete Sealer and bare (unsealed) ElectraGuard ESD Floor paint without the addition of Copper or aluminum ground foil tape. This is generally NOT recommended for ESD tiles, sheet vinyl and most ESD thick set epoxy coatings as the top surface of these items are NOT as conductive as the conductive adhesives or the conductive bottom layer beneath most thick set epoxies.
Contact United Static Control Products! Tame the Static Beast Before it Takes another Byte! © 1996 - 2026 All rights Reserved This page last Updated on 06/01/2026 |
||||||
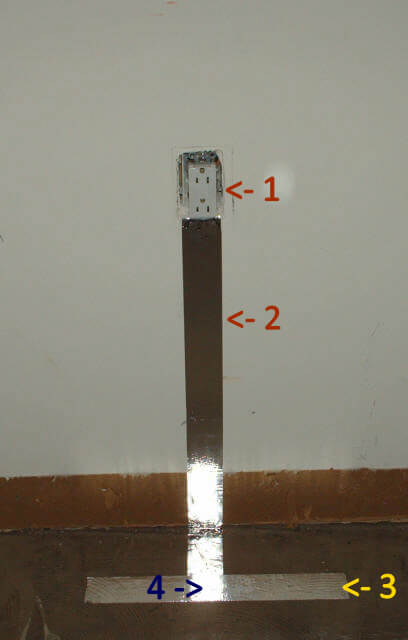 1) Locate AC power outlet. Note:
De energizing the outlet is highly recommended. Remove the center screw of the
AC electrical face plate cover (this cover is typically plastic).
Carefully remove the face plate. Starting at the AC
drywall cutout (1), run a piece of our 2" wide
1) Locate AC power outlet. Note:
De energizing the outlet is highly recommended. Remove the center screw of the
AC electrical face plate cover (this cover is typically plastic).
Carefully remove the face plate. Starting at the AC
drywall cutout (1), run a piece of our 2" wide
 STEEL
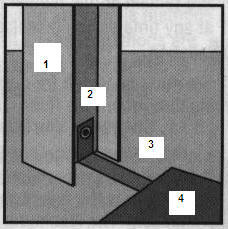
STRUCTURAL SUPPORT COLUMNS: In
this drawing a steel column (1) is used as an attachment
point (2) for the aluminum or copper adhesive backed ground foil (3) for subsequent
application of ESD flooring adhesive, interlocking (no
adhesive ESD tiles or coatings (4).
STEEL
STRUCTURAL SUPPORT COLUMNS: In
this drawing a steel column (1) is used as an attachment
point (2) for the aluminum or copper adhesive backed ground foil (3) for subsequent
application of ESD flooring adhesive, interlocking (no
adhesive ESD tiles or coatings (4).
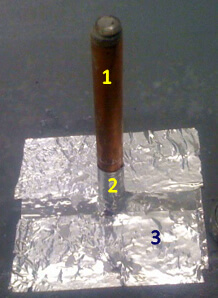 GROUND
RODS: Copper
ground rods are often used in Military and Munitions
environments and are not typical (nor normally recommended)
for electronic manufacturing.
GROUND
RODS: Copper
ground rods are often used in Military and Munitions
environments and are not typical (nor normally recommended)
for electronic manufacturing. 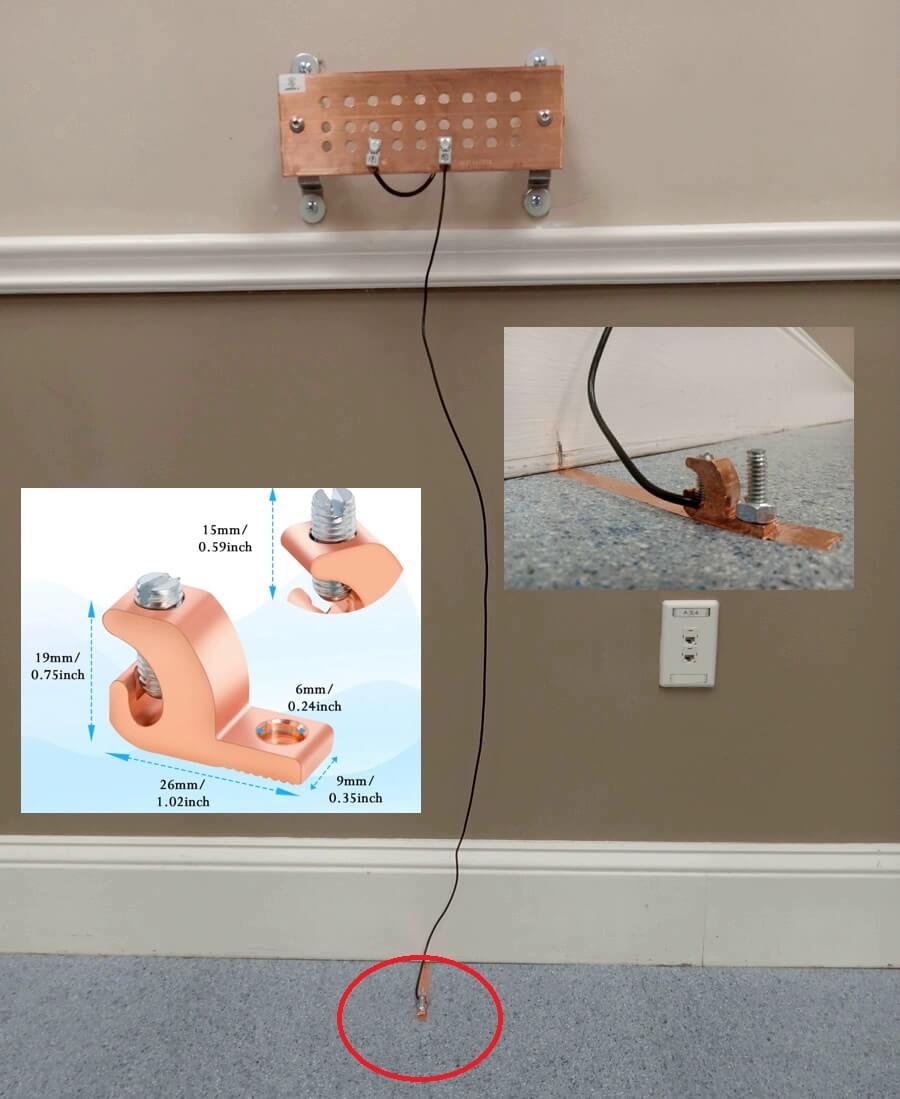